
Home Assistant can connect a soil-moisture sensor, a pump relay, leak detection, and a schedule. But “moisture below 40% — start the pump” is not yet a safe watering system. It needs a freshness check, bounded runtime, a recovery interval, and defined behavior after a fault.
Begin with observation rather than automation. Water manually for several days, review the trend, and record the delivered volume. This establishes the operating range of your sensor, substrate, and pot instead of borrowing somebody else's threshold.
Try watering and history before connecting equipment
Open Manual watering in the GrowerHub demo, click “Start watering” on the card for your greenhouse and start a one-minute cycle. The log opens automatically on the same card. It shows the current run, then its duration, estimated volume and completion reason when watering stops. Under Devices and environment, change soil moisture or trigger a virtual leak to inspect the scenario’s response.
This is a server simulation in the regular application; it does not activate real pumps. Guest changes last 24 hours. Save the demo to an account to continue later.
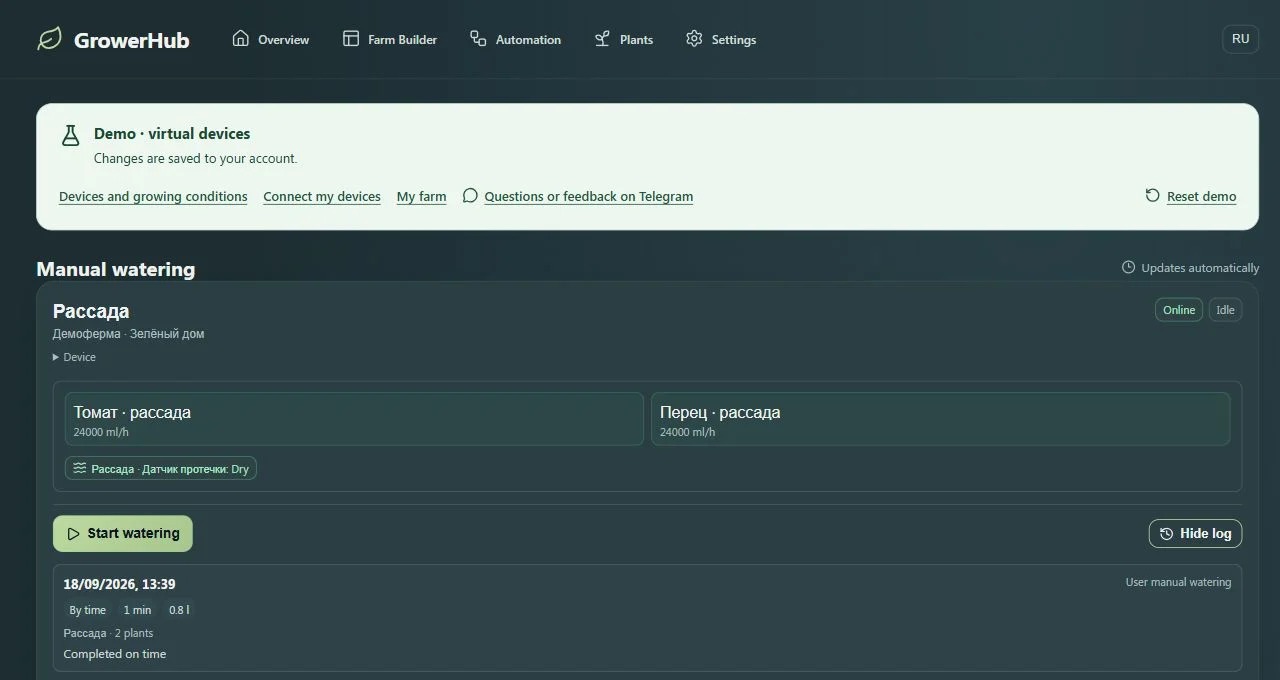
This saved demo farm has Russian plant and greenhouse names. Switching the interface language keeps those names as entered.
If Home Assistant is already running
The current GrowerHub MQTT connector adds devices from an existing Zigbee2MQTT network. It does not import ZHA devices, arbitrary Home Assistant entities or earlier HA history. It forwards the selected network's device list and readings and permits commands back to those devices. There is no separate read-only mode or single-device filter.
If this route fits your setup, start with the Zigbee2MQTT connector guide: wait for a fresh sensor reading and open its graph in GrowerHub. Keep existing HA automations in charge during this check. Two systems must not automatically control the same pump or valve at the same time.
Minimum setup
| Entity or function | Purpose | Verify |
|---|---|---|
| soil-moisture sensor | feedback from the root zone | calibration, placement, and last update time |
| pump relay, smart plug, or valve | water delivery | electrical or hydraulic load, restart state, and manual shutdown |
| leak sensor | emergency input | a physical wet test and reliable availability |
| “automatic watering allowed” helper | maintenance lockout | it is disabled before servicing the line |
| log or history | result analysis | start, stop, reason, and duration for every cycle |
Air temperature and lighting can be additional conditions, but they do not replace the basic water safeguards.
Step 1: Verify the sensor manually
Place the probe in the root zone but not directly under a dripper. Record its value before manual watering and after water has distributed through the substrate. Repeat for several cycles. Choose a threshold with enough margin for normal noise rather than using a universal percentage.
If an entity becomes unknown or unavailable, the automation must not reuse its last number. For MQTT sensors, configure availability; the official Home Assistant MQTT integration explains discovery and availability topics.
Step 2: Measure actual delivery
Run the pump or open the valve manually for a known time and measure the volume. Repeat at least three times. If the results differ noticeably, fix power, pressure, tubing, or drippers before writing a rule. Runtime alone does not tell you how much water reached a pot unless delivery is repeatable.
Separate crops or containers with materially different substrate, size, or demand into different zones. One channel is suitable only for outlets that behave similarly.
Step 3: Separate trigger, conditions, and actions
Home Assistant evaluates a trigger, checks conditions, and then runs actions. The official documentation covers automation triggers and conditions.
A practical zone rule looks like this:
- moisture remains below a verified threshold for a defined time;
- watering is allowed, required sensors are available, and no leak is present;
- the minimum interval since the previous cycle has passed;
- the daily water or runtime budget is not exhausted;
- the actuator runs for no longer than its tested maximum;
- shutdown and the reason are written to history.
Choose an execution mode that prevents parallel runs for one zone. Even then, a software delay is not independent protection. A restart, lost connection, or stuck relay must still lead to a safe state at the controller, valve, or power level.
Step 4: Test failure paths
Do more than press “Run.” During short supervised tests:
- disconnect the moisture sensor and confirm that watering cannot start;
- wet the leak sensor and verify immediate shutdown;
- restart Home Assistant during a test cycle;
- temporarily interrupt MQTT;
- enable the maintenance lock and check every related rule;
- restore power and verify the actuator's default state.
If the outcome is not obvious in the interface and history, the system is not ready to operate unattended.
What belongs on the dashboard
The first screen needs the zone, current moisture and update time, actuator state, leak state, last watering, and any blocking reason. Put the trend below those operational facts. An operator should not need five cards to answer “is water flowing now?”
GrowerHub can provide the zone model, history, and equipment controls while MQTT and Zigbee2MQTT remain the integration layer. The farm automation page shows the zone overview, history, connection state, and automation separately.
Pump, smart plug, or Zigbee valve
Home Assistant may expose an actuator as a switch or valve, depending on its integration and model. A pump connected through a smart plug requires verification of starting load and the state after power returns. A valve requires correct flow direction, working pressure, complete closure, and a manual way to stop water.
The safeguards stay the same: commands require fresh data, every run is bounded, and leak detection closes water immediately. The Zigbee irrigation valve guide covers model capabilities and entity checks in detail.
Limitations
Home Assistant cannot inspect plumbing, tube connections, or relay load ratings. Mains electricity and equipment near water require appropriate installation. Do not enable a new watering system for the first time just before leaving; observe several complete cycles after every sensor, tube, threshold, or firmware change.
Checklist before automatic mode
- the sensor is calibrated in the actual substrate;
- stale readings become unavailable or block the rule;
- delivered water has been measured;
- per-run, recovery, and daily limits are active;
- leak detection stops the actuator;
- manual lockout works;
- every start and stop appears in history;
- power and communication failures were tested under supervision.
This approach produces fewer flashy rules but turns Home Assistant into an observable control system rather than a timer with a chart.
For a first hardware setup, see the sensor examples and Zigbee smart plugs; these are options, not a mandatory kit.